Showing posts with label Studio J. Show all posts

Thursday, November 20, 2014

DIY Christmas Cards

Here we are at mid-November . . . you know what that means - time to start thinking about Christmas cards!    I know not everyone mails cards anymore for the holidays - but I still do!   Despite the outrageous cost of postage - I just love the tradition of it and look forward to the weeks before the Christmas when we open the mailbox each day to find news from our friends and family afar!   Even if you don't send out mass quantities of holiday cards - I encourage you to send handwritten greetings to at least a few very special people - it means so much more than an email!!

So with that in mind, I wanted to give you some great options for beautiful & easy holiday cards.   I know some of you design your own cards & that is great - but I get tons of queries every year about 'kits' as a lot of people just don't have the time during this busy season to create multiple cards from scratch.   So here are my top recommendations this year:

1)   CTMH's Cut Above Holiday Card Kits:


Pair either kit above with the Merriest Christmas Stamp Set (B1468) - $10.95Cdn to complete the greetings on your cards (I recommend stamping in red (ruby or cranberry) or black ink):


One of my finished Cut Above cards & pre-printed envelope:

Each Cut Above card kit contains the materials for you to make 10 cards (5"x7" size!!).   Embellishments include glitter trims and papers, twine, die-cut shapes, foam tape, etc.    I love these cards and they literally come together in MINUTES!!!!  So easy & so cute!   One stamp set gives you four different holiday greetings to choose from in gorgeous, trendy font styles.     As the cards are 5"x7" size you can easily fit a photo inside your card/envelope to send with your greetings.      Buy the one stamp set & then as many multiples of the card kit as you need depending on how many cards you plan to send out this year.  

2)  CTMH's Snowhaven Cardmaking Workshop on the Go:


The Snowhaven Cardmaking Workshop on the Go kit (G1085) - $27.50 Cdn, is the perfect option if you'd like to spend a little more time & effort creating your Christmas works-of-art because you enjoy the process & want to learn new techniques.    Each kit contains the materials & accessories, as well as the stamp set needed to create 15 beautiful cards (5 each of the 3 designs shown above).     You will also need red, blue and grey inks to complete your cards (Cranberry, Glacier, and Slate are recommended to complete the cards exactly as shown).    Completed cards are standard 4.25" x 5.5" size.    Kit includes a full-colour workshop instructional guide!!   Easy to complete at home on your own in just a few hours!

3)   Go digital this year with CTMH's Studio J!!   

(See my post HERE on how-to with step-by-step instructions and photos!!)

Here are the cute cards I did last year:

Each Studio J layout is two 12x12 sheets (high quality photo printing!).   My cards were 5"x7" size - so I was able to fit four per sheet or 8 cards per 'layout'.    If your cards were smaller - you could obviously fit more.  

Until November 30th - you can order Studio J layouts for $5 (plus tax & shipping).   That's only $0.63 for each 5"x7" photo card!    (After November 30th - regular pricing applies - $7.75 Cdn per each 2 page layout or $0.97 per card).

Need envelopes for your photo cards!?!?  You can order those HERE.

Hope that gives you some ideas!!   Not too late to add a little 'handmade' to your holidays this year!!  With every order placed either online at my WEBSITE or via email by November 30th - you'll be entered into my draw for a $25 CTMH gift certificate.    One entry for every $25 spent.   Good luck!


Friday, November 14, 2014

Custom Holiday Photo Cards

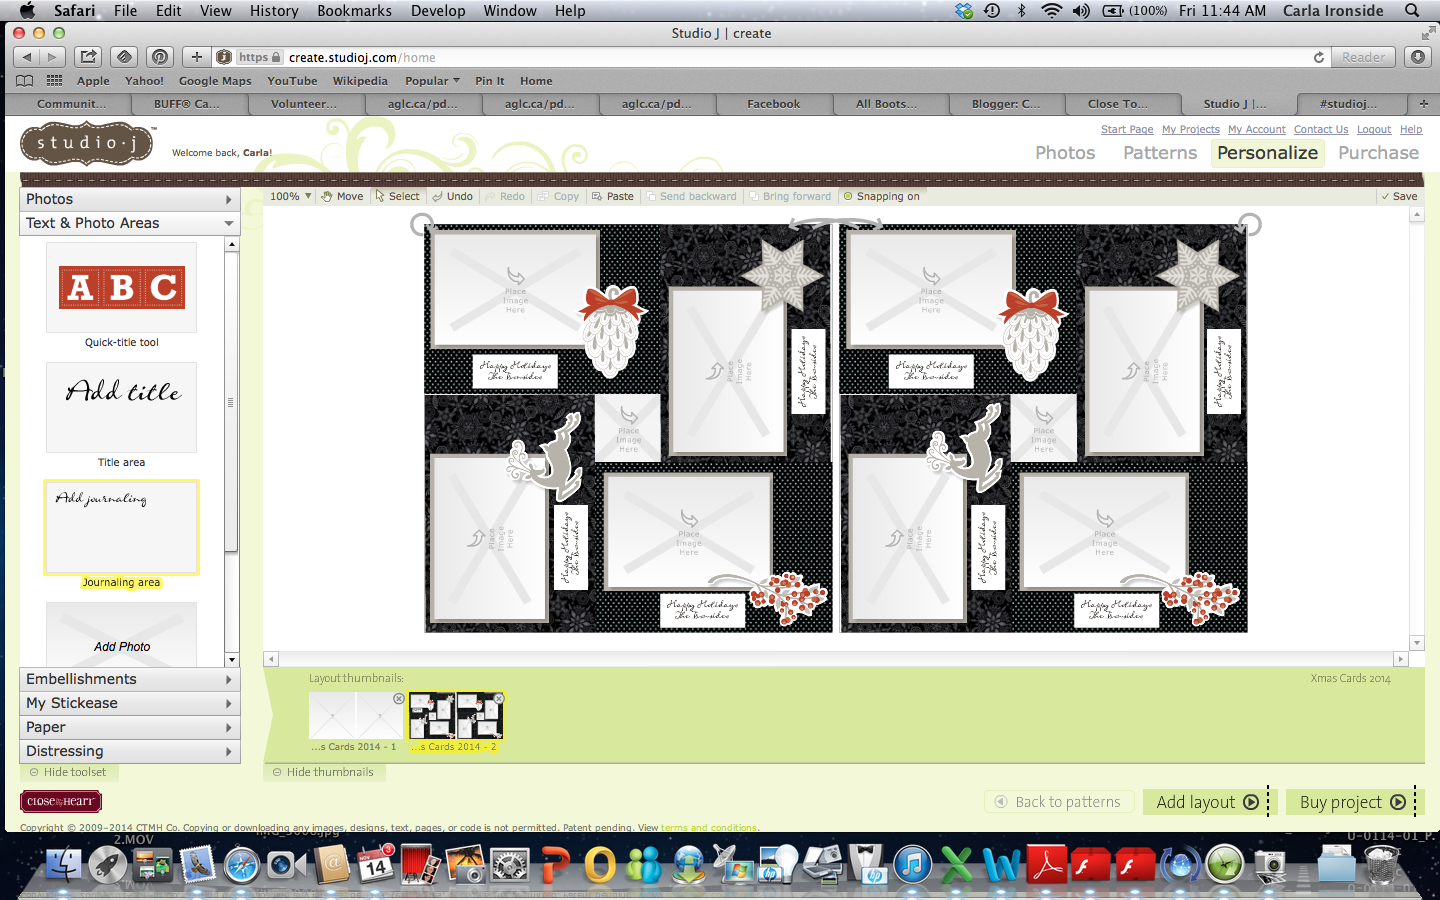
Make your own custom photo greeting cards (perfect for Christmas!) in CTMH's Studio J!

Here are the cards I made last year:

Here is how-to make your own:
Each Studio J layout is two 12x12 sheets (high quality photo printing!).   My cards are 5"x7" size - so I was able to fit four per sheet or 8 cards per 'layout'.    If your cards were smaller - you could obviously fit more.  

1)   Go to my website carlaironside.ctmh.com & click on "Products" then "Studio J Online Scrapbooking".  

2)  Click "Enter Now" and either login or create a new account if your are a new user.

3)  On the welcome screen, click "Create a New Project" & then name your project when prompted.

4)  Click the uploading button to select the photo(s) you want to add to your holiday cards.

5)  Then select "Create your own Custom Layout".

6)  You'll now be asked to select your paper kit.   At the top you can choose to filter the kits - select "Holiday".   Then select which paper collection you'd like to use on your cards.    The one I used above is called "Sparkle & Shine".   Others I would recommend are Snowhaven, Pear & Partridge, Mistletoe, Jingle, Believe, Evensong, Frosted . . .  so many great choices.  (To select it, either double click on it or click once on it and then click "Continue" at the bottom).

7)  You'll now be asked to choose the layout pattern - select the "NO LIMITS" pattern.

8)   Select a Kit Mix - - these are blank for the "No Limits" pattern - so it doesn't matter here whether you choose 1,2, or 3.  Just pick one and continue.

9)  Now you have a blank canvas to start creating your cards.   On the left select "Text & Photo Areas".   Then drag the "Journaling Area" box onto your blank layout.   An editing box will appear.   In the editing box - size your card (my cards are 5"x7" - so that is the size I input in the boxes).  


Click on the text in the journaling box to highlight it and press your space bar to delete it.
Drag the journaling box to place it flush with one of the corners of your layout.   Click on the "Copy" and "Paste" buttons at the top.  This will create another identical journaling box.   Drag it to another corner of the layout to place it.    Repeat for all of your horizontally placed cards (see above - there are 4 horizontal & 4 vertical).   To create the vertical ones - click Copy & Paste again then use the rotation tool (round arrow on corner of box) to turn the box sideways & place as needed.  

When you have all 8 journaling boxes (cards) created -  your layout will look like this - with two small unused squares of space in the centre of each layout.

10)   Next click on the paper tab on the left.   Select any of the papers shown and drag and drop to fill the background of your cards.


11)  Now is time to add your photo boxes.   On the left click on "Text & Photo Areas".  For each card, drag the "Photo Area" box wherever you want to place your photo.    You can use the editing box as needed to size the photo area, add a photo mat, choose photo mat colour, etc.    I used 3.5" x 5" photo areas with 1/8" photo mats.   (Once you've done the first photo area - you can copy and paste using the top buttons to create your remaining photo areas and just drag/rotate onto the cards as needed).


12)  Now select "Photos" on the left and drag and drop your photos onto the photo areas on each card.

13)  Now is time to decorate your cards.    Select either embellishments (buttons, ribbons, etc.) or My Stickease on the left.   Use the drop down menu to select the type of embellishment.  You can drag/drop, resize, rotate all embellishments as needed to customize your cards.   You can also find holiday quotes and tags in the Stickease section that you may wish to use to add greetings to your cards.


14)   To add a custom greeting or your family name, etc. to the cards.   Select "Text & Photo Areas" on the left.  Then drag the "Journaling Area" box onto your first card.    Size your journal box as needed (mine is 1" x 2.5").  You can edit the text, change the background, add a mat, change the font, etc. as needed.   Make sure that the 'scale font' box is checked so that your text fits inside the box.   Once you have your journal box completed - use the Copy & Paste feature to add the same journal box to the rest of your cards.

15)  When you are happy with your cards - click "Buy Project" at the bottom and follow the prompts to complete your purchase.   (At the bottom, click on Approve Layouts, then when approved, click on Checkout).   You can order your printed copies (in whatever quantity you choose) and your cards will arrive in approximately a week.


Studio J layouts are on sale for just $5 each until November 30th - that's $0.63 for each 5" x 7" card.
(After November 30th - pricing returns to the regular price of $7.75 Cdn per 2 page layout).

Start creating your Studio J Holiday Photo Cards HERE.


Monday, July 29, 2013

Shoot for the Stars

Let's Get Sketchy is hosting an 'Anything Goes' challenge for you this week!   Hope you'll play along!

Here is my layout for the challenge:


Chipboard alpha is inked in Cranberry ink with a sponge and then stamped on in black ink with various CTMH background stamps.  I also inked the edges of the letters in the black ink. 

Journalling was printed on my computer (white font with black background).

Chipboard stars were covered in patterned paper, which I trimmed to size with a craft knife, and then the edges were inked in black ink.  

I was totally inspired by Karen Pedersen's layout of the same title HERE.   

The sketch for my layout is actually a 'pattern' from CTMH's digital program Studio J called "Super Star".   

Materials Used:
CTMH paper collections (both retired): Superhero & Sweetheart
CTMH Black Waxy Flax (retired)
CTMH Cardstock: Black, White Daisy
CTMH Ink: Cranberry, Black
CTMH Chipboard Letters - Dimensional Elements Monagrams
CTMH Stamp Sets - various retired
Staples

Don't forget to link up any new layout you create this week at Let's Get Sketchy for our "Anything Goes" challenge! 

Sunday, September 9, 2012

Studio Sunday - Backyard Campout

A quick post this Sunday to share with you my most recent Studio J digital layout.  I used the Flirty kit for this one, which, of course, is also one of our great new paper packs in the Fall/Winter Idea Book.  

(Click on the photo to see larger):


Don't you love the owl!?!   A great 'sticker' available in the digital form and in the Chipboard pack that matches the paper!  

More pics of our summer fun!!  We camp a lot - but always in a trailer - - so the kids have been asking for quite a while if we could sleep out in our tent.   So we picked a night & set it up in our backyard!!  Lots of fun!   The kids were thrilled!

Hope you all had a great weekend!   I was in Edmonton for a CTMH Regional event.  We had a great time and wow do I have a TON of artwork to share with you - - we did more than 8 hours of creative projects on top of some great classes and discussions!       Fabulous event!

Try Studio J for yourself on my Website!   Free to try & play with -- no cost to you until you decide to purchase a layout you have created :-)


Saturday, August 25, 2012

Studio Saturday - At the Zoo

I haven't shared a digital Studio J layout with you for a while, but it isn't for a lack of creating - in the last two months alone I have created a total of 75 digital layouts (2 page layouts - for a total of 150 pages!!!!)      That is on top of all the regular scrappin' I do!!    Studio J is just SO quick & easy & the pages are gorgeous - love it!

When I attended CTMH Convention back in July, we were given 5 free layouts as part of our attendance package.  Here is one of the layouts I created (click to view it larger!!):


There is so much new & great with Studio J - if you haven't tried it in a while, now is a great time!

- no memberships anymore - which means ALL of the great content - all patterns, all papers, etc. are available FREE to all users!
-  Playing and creating in Studio J is still FREE!!  Use it to your hearts' content and decide if it is for you - - you don't pay anything until you decide to purchase a created project.   
-  layout prices are now $6.95 per two page layout - less than $3.50 per page - and you get free JPG's of all your layouts when you purchase the print!
- you can opt to purchase the JPG only for $2.95 per two page layout
- we now offer "Express Collections" for quick photo book making -- simply add your photos, titles, and journalling and voila - - gorgeous albums in minutes.  Each collection includes 10 unique two page layouts PLUS a front layout and a back layout for your album.   There are a variety of themes to pick from - you will love how easy these are!
-  Studio J layouts are now available free as Hostess Rewards when you host a virtual or traditional gathering AND layout purchases can now count towards gathering totals - earn free HOSTESS REWARDS when you create with Studio J - just contact me to set up your virtual gathering & start creating!  
-  Studio J purchases also count towards my own Creative Rewards Club!  

If you are new to Studio J - - I offer a FREE introductory lesson!   We can get together in person if you are local to me or via the phone/skype if you are long distance - - I'm happy to help you get started!   Send me an EMAIL to set up your appointment!

Give Studio J a try - - I promise you'll fall in love with digital scrapbooking!!


Wednesday, July 25, 2012

Celebrate with CTMH Elemental

Hey everyone - hope you are having a great summer.  I'm back from CTMH Convention in Dallas, followed by a week of holidays with the family . . . trying to get back into the swing of things & back creating again.  I have so many new goodies in my craft room - can't wait to start playing!  

I'm still working on the big memory keeping project for my grandparents' 60th anniversary as well (I originally blogged about that HERE).   The anniversary is now less than 2 weeks away - so I'm getting down to the wire.  I've created over 70 two-page layouts in Studio J for an album I'll be presenting to my grandparents as a gift.  Will be sharing some of those here on the blog in the coming weeks - so watch for that!  I can't say enough good things about Studio J and how great it is for scrapbooking a big project like this!   I never would have been able to compile so many pictures & memories in such a short time if I were doing a traditional album.  Another great thing is that I can order copies of the pages from CTMH for any family members who wish to have this great collection of family memories in their own homes.   Now that the album pages have been ordered, I'm working on the slide show for the reception which I'm co-MC'ing with my cousin Wendy.   I so hope that my grandparents enjoy this walk down memory lane . . .

Thought it was probably about time I shared some new artwork with you.  This past weekend we had a birthday party for my Dad - here is the card I created for him.


I find that simple is always better when creating masculine cards & layouts.  This card was inspired by a card I saw HERE created by Dena Hughes, a fellow CTMH consultant.

My card is 5x7 size.  The corrugated stars are part of the CTMH Milepost Shapes collection of corrugated kraft embellishments.  The blue star and bracket sentiment block were cut the with CTMH Cricut Art Philosophy cartridge.  The sentiment stamp set is one of the great sets that comes included in the Art Philosophy Cricut collection. The paper is the soon to be retired Elemental pack (available until July 31st).   Ink: Pacifica & Cranberry.  Cardstock: Kraft, Colonial White, Pacifica.  Sparkle: Red/Pink/Purple Collection.

Have a great rest of the day :-)

Friday, June 15, 2012

My Summer Memory Keeping Project

I started this week on a HUGE undertaking!!
My grandparents will be celebrating their 60th Anniversary this summer.   Truly amazing!
At their wedding - 1952
At their 50th Anniversary Celebration in 2002
Well when we started planning the celebratory events for this momentous occasion, it seemed to make sense to me that I volunteer to create a slide show for the reception and an album to give my grandparents as a gift.   I do 'memory keeping' pretty much full time, right?!?!

Well - - let me tell you - - 60 years of marriage, 4 kids, 13 grandchildren, and 13 great grandchildren create a whole LOT of photos & memories.     This is going to be a really big job that is going to consume a big chunk of my time over the next 6 or so weeks - - but I think it is going to be sooooo worth it.

Here is my plan - I have been collecting photos from cousins, aunts, uncles, and other family & friends for the project.  (I'm talking a whole big box of photos people!!!)  Some are on CD but most are originals requiring scanning for my project (yikes - the scanning takes a lot of time!)   I recently purchased a Mac (which I love!) so I'm creating a slideshow using my IMovie software on my computer.  I have begun this phase of the project & it is going pretty well so far.  I still have some photos to add that I'm waiting for from people & lots of captions/dates, etc., but the general framework of the slideshow is in place.    I basically set up the slideshow as a timeline of their lives.   I'm quite excited about how it is all coming together.  The biggest challenge with the slideshow is keeping it to a reasonable length!  As I said - 60 years = lots of photos.  Our family is large & I want to make sure everyone has their special photos of & with grandma & grandpa included in the presentation.  But I may have to work on paring it down a little when I'm done adding all the content.

The second phase of the project will be to complete a Studio J album to give my grandparents as a gift at the Anniversary celebration.  I can't possibly include all of the photos that I have collected in the slideshow presentation - we'd be watching it all night - so I'm hoping by doing the album I can add more photos and memories and more written details.   Also - by creating a Studio J album, I'll be able to provide extra copies of the layouts for anyone in the family who would like to have this collection of our family photos and stories in their own homes.    For myself, I plan to have a copy printed for my family & am so excited that my kids will have this record of our extended family's history and heritage.

(On a sidenote - for those that don't know, Studio J is CTMH's digital scrapbooking program!  One tip I've already learned - if you are scanning photos to include in your digital scrapbooking & plan on printing the layouts - be sure you set your resolution on your scanner high enough for 'print quality'!!)

So . . . if the blog is quiet in the next several weeks - - you now know why!!  I'm not absent - just working away on this gigantic memory keeping project.   I hope to share some of the finished product here once I'm done - so stay tuned for that.

Wish me luck . . . 49 days to go until the party!

Sunday, April 15, 2012

Studio Sunday

I have a digital layout to share with you today.  This was created in CTMH's digital program Studio J
I used the super fun Cruisin' kit which is currently available in both a paper kit and the digital format

My uncle is a real-life race car driver -  he races alcohol funny cars on a drag strip!  We have visited the 'track' to watch him a few times over the last couple of years - so when I saw the new "Crusin'" line from CTMH - I thought of these pics right away!

You can click on the layout if you'd like to view it larger.  Love the digital stickers available with this kit - road signs, arrows - lots of fun, masculine embellishments!


Saturday, March 24, 2012

Studio Saturday

Hi everyone!  I have a new "Studio J" CTMH digital layout to share today.  I used the Stardust kit for this one - such a great kit for little boy pictures!  And it matched my little guy's outfit PERFECTLY!! Love when that happens!

Enjoy the rest of your weekend!  I'll be back with some new artwork to share on Monday!

Sunday, March 18, 2012

Studio Sunday

I have a new Studio J digital layout to share with you today.  I used the Lucy kit for this one (which is also available in a traditional paper kit).   My little girl didn't get to come home with us until she was 6 weeks old because she spent the first part of her life in the NICU - - these photos were taken a few days after we got to bring her home.  She weighed 3.5 lbs when she was born - - and about 5 lbs in these photos!  Just a tiny little thing!   You'll notice her head is partly shaved - - they had to do that at the hospital for IV lines.  Poor thing - what a crazy haircut!   Thankfully it grew back in beautifully!!

Enjoy the rest of your weekend!!

Saturday, February 18, 2012

CTMH Superhero for Studio Saturday

My Studio J layout feature for this week uses the kit "Superhero" which is also one of the new paper packs from CTMH in the Spring/Summer 2012 Idea Book.  I created this layout digitally in Studio J - - but you could also re-create this with the scrapbooking paper kit!  (The Cricut Art Philosophy cartridge has great star shapes to choose from and the Hero Alphabet stamp set is the perfect font!)  Love this kit for little boy layouts!

My pictures feature my little boy perfecting his Superhero moves while jumping around on the family room furniture.  I'm constantly reminding him that furniture is not for standing/jumping on -- but on this particular day I just had to laugh and pull out my camera as he had the time of his life jumping from couch to table to chair and back again!  Too funny!!   Boys will be boys, right?!?


  Thanks for stopping in today!  Enjoy the rest of your weekend!


You can shop my CTMH Website HERE!
Try Studio J for free HERE!

Saturday, February 11, 2012

Studio Saturday CTMH Wedding Layouts

Hey all  - welcome to another Studio Saturday.  I love spending the time featuring CTMH's great digital program "Studio J".

This week I have three two-page layouts to show you, all created in Studio J.  We attended the wedding of good friends on New Year's Eve and these are the layouts I created to remember the occasion!   The digital kit is Silhouette (a once very-popular paper kit by CTMH - so glad it is now available in digital format).  I highlighted the gorgeous neutral kit with pops of red - which was the main wedding colour!  (You can click on any layout to view it larger).


I love using Studio J for occasions where I have many, many photos.  I find it so hard to design great paper pages when working with 8+ photos, but with Studio J it is easy as the design part is already done, I just have to drag & drop my photos for a great layout!

I also love the fact that I can create transparent text boxes to place right over photos - notice how I added names over the photos in the third layout. 

That's it for me today.    My daughter plays hockey and it's a game day!! Off to ring my cowbell in the stands!!

Have you tried Studio J yet?  It is free to play & create with!  You only pay when you are ready to print your layout!    Check it out HERE.

Enjoy the rest of your weekend!

Saturday, February 4, 2012

Studio Saturday with CTMH's Studio J

A Studio J digital layout to share on this sunny Saturday:

My daughter and I were invited to attend the Selena Gomez concert here in Calgary this past summer.   My daughter was THRILLED!  We were lucky to have great seats & so I was able to snap some pretty good photos for this layout.    The CTMH Studio J kit used is "Whoops-a-daisy". 

Hope you are enjoying your weekend!! Check back tomorrow for some announcements, including the winner of my $100 shopping spree giveaway!  

Try Studio J for your next layout HERE!  (It's absolutely FREE to play & create!)
Ready to print your layouts?  Check out our AMAZING Studio J "Five for Free In February" special!

Saturday, January 14, 2012

Taylor Swift - U ROCK!!

A fun layout today for my weekly Studio J feature!  I took my daughter to a Taylor Swift concert this past summer and we had so much fun!  This was our second time seeing her in concert - she puts on a really great show if you've never been!  I thought this pattern in Studio J was perfect to showcase all of the great photos we captured that evening (most courtesy of my sister who was snapping all the pics that night)! 

One of the great things about Studio J is that you can search the patterns available by how many photo wells they include (i.e. if you know you want to include 10 photos - look first at all the patterns/templates with 10 photo wells. If you don't find exactly what you are looking for you can customize other templates by adding or deleting photo wells as needed - but I always look first at the ones given!)


The digital paper kit used is actually called "You Rock" which gave me the inspiration for the title!

You can try Studio J for free!! Check it out HERE

Have a great weekend,

LinkWithin

Blog Widget by LinkWithin