Showing posts with label Cards. Show all posts

Thursday, November 20, 2014

DIY Christmas Cards

Here we are at mid-November . . . you know what that means - time to start thinking about Christmas cards!    I know not everyone mails cards anymore for the holidays - but I still do!   Despite the outrageous cost of postage - I just love the tradition of it and look forward to the weeks before the Christmas when we open the mailbox each day to find news from our friends and family afar!   Even if you don't send out mass quantities of holiday cards - I encourage you to send handwritten greetings to at least a few very special people - it means so much more than an email!!

So with that in mind, I wanted to give you some great options for beautiful & easy holiday cards.   I know some of you design your own cards & that is great - but I get tons of queries every year about 'kits' as a lot of people just don't have the time during this busy season to create multiple cards from scratch.   So here are my top recommendations this year:

1)   CTMH's Cut Above Holiday Card Kits:


Pair either kit above with the Merriest Christmas Stamp Set (B1468) - $10.95Cdn to complete the greetings on your cards (I recommend stamping in red (ruby or cranberry) or black ink):


One of my finished Cut Above cards & pre-printed envelope:

Each Cut Above card kit contains the materials for you to make 10 cards (5"x7" size!!).   Embellishments include glitter trims and papers, twine, die-cut shapes, foam tape, etc.    I love these cards and they literally come together in MINUTES!!!!  So easy & so cute!   One stamp set gives you four different holiday greetings to choose from in gorgeous, trendy font styles.     As the cards are 5"x7" size you can easily fit a photo inside your card/envelope to send with your greetings.      Buy the one stamp set & then as many multiples of the card kit as you need depending on how many cards you plan to send out this year.  

2)  CTMH's Snowhaven Cardmaking Workshop on the Go:


The Snowhaven Cardmaking Workshop on the Go kit (G1085) - $27.50 Cdn, is the perfect option if you'd like to spend a little more time & effort creating your Christmas works-of-art because you enjoy the process & want to learn new techniques.    Each kit contains the materials & accessories, as well as the stamp set needed to create 15 beautiful cards (5 each of the 3 designs shown above).     You will also need red, blue and grey inks to complete your cards (Cranberry, Glacier, and Slate are recommended to complete the cards exactly as shown).    Completed cards are standard 4.25" x 5.5" size.    Kit includes a full-colour workshop instructional guide!!   Easy to complete at home on your own in just a few hours!

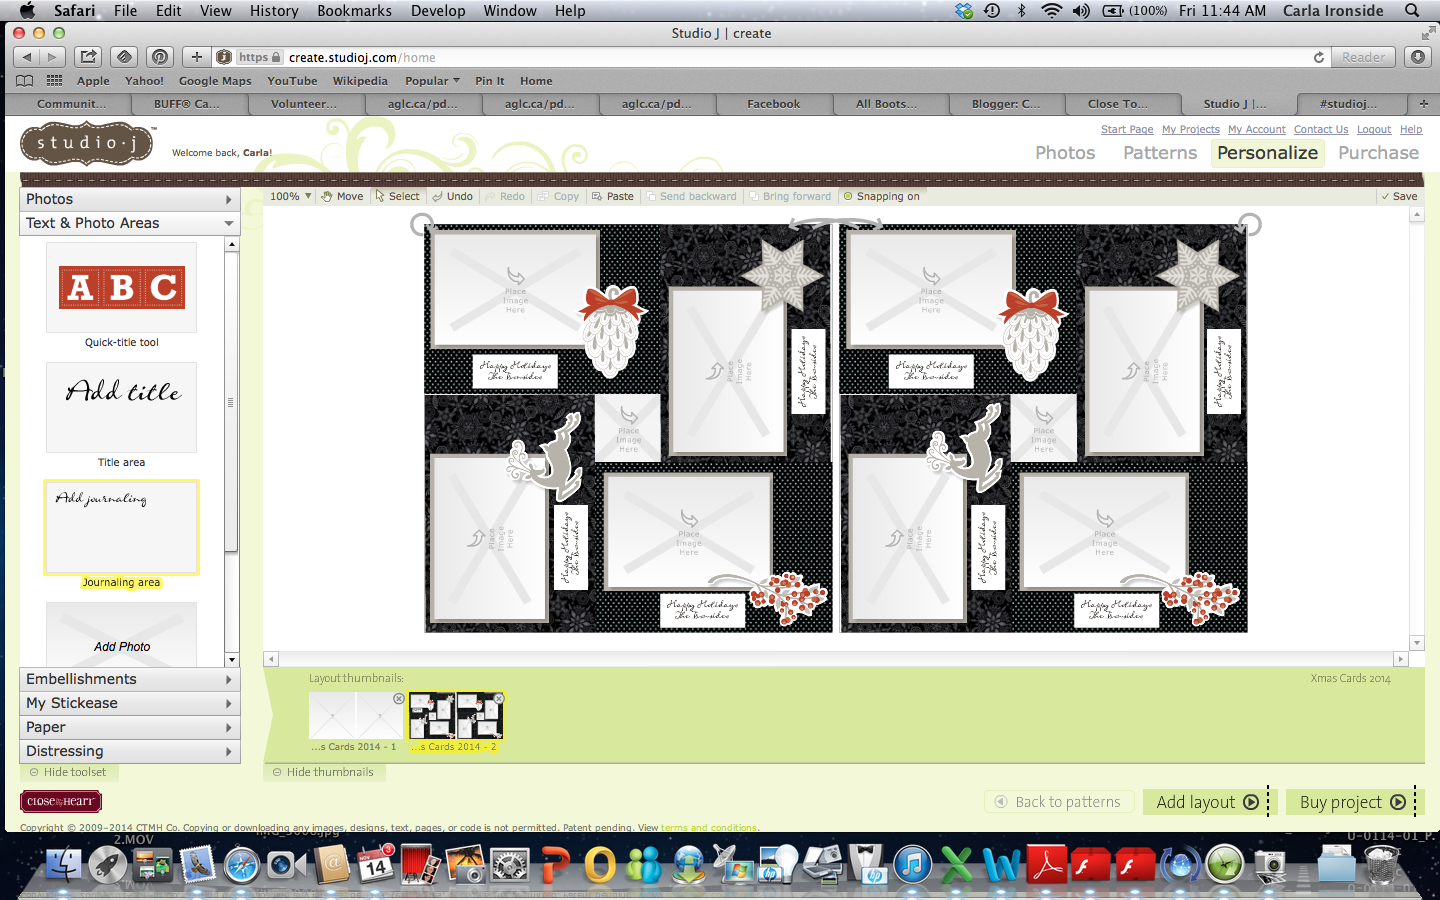
3)   Go digital this year with CTMH's Studio J!!   

(See my post HERE on how-to with step-by-step instructions and photos!!)

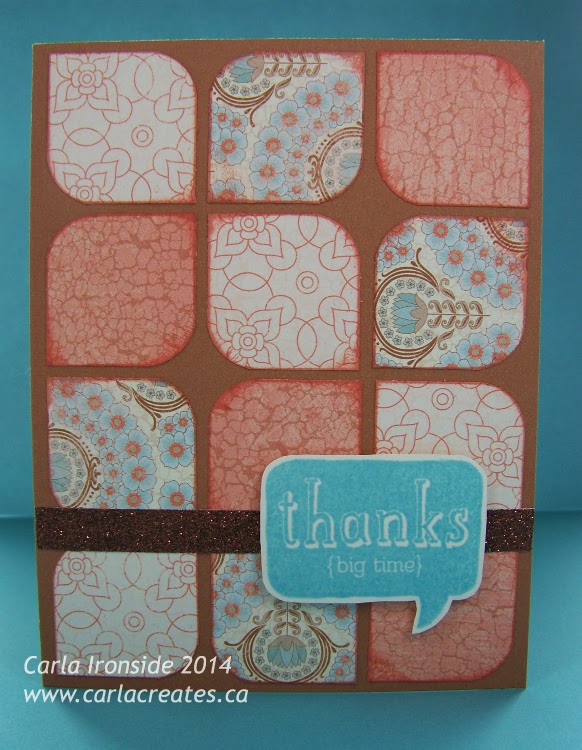
Here are the cute cards I did last year:

Each Studio J layout is two 12x12 sheets (high quality photo printing!).   My cards were 5"x7" size - so I was able to fit four per sheet or 8 cards per 'layout'.    If your cards were smaller - you could obviously fit more.  

Until November 30th - you can order Studio J layouts for $5 (plus tax & shipping).   That's only $0.63 for each 5"x7" photo card!    (After November 30th - regular pricing applies - $7.75 Cdn per each 2 page layout or $0.97 per card).

Need envelopes for your photo cards!?!?  You can order those HERE.

Hope that gives you some ideas!!   Not too late to add a little 'handmade' to your holidays this year!!  With every order placed either online at my WEBSITE or via email by November 30th - you'll be entered into my draw for a $25 CTMH gift certificate.    One entry for every $25 spent.   Good luck!


Friday, November 14, 2014

Custom Holiday Photo Cards

Make your own custom photo greeting cards (perfect for Christmas!) in CTMH's Studio J!

Here are the cards I made last year:

Here is how-to make your own:
Each Studio J layout is two 12x12 sheets (high quality photo printing!).   My cards are 5"x7" size - so I was able to fit four per sheet or 8 cards per 'layout'.    If your cards were smaller - you could obviously fit more.  

1)   Go to my website carlaironside.ctmh.com & click on "Products" then "Studio J Online Scrapbooking".  

2)  Click "Enter Now" and either login or create a new account if your are a new user.

3)  On the welcome screen, click "Create a New Project" & then name your project when prompted.

4)  Click the uploading button to select the photo(s) you want to add to your holiday cards.

5)  Then select "Create your own Custom Layout".

6)  You'll now be asked to select your paper kit.   At the top you can choose to filter the kits - select "Holiday".   Then select which paper collection you'd like to use on your cards.    The one I used above is called "Sparkle & Shine".   Others I would recommend are Snowhaven, Pear & Partridge, Mistletoe, Jingle, Believe, Evensong, Frosted . . .  so many great choices.  (To select it, either double click on it or click once on it and then click "Continue" at the bottom).

7)  You'll now be asked to choose the layout pattern - select the "NO LIMITS" pattern.

8)   Select a Kit Mix - - these are blank for the "No Limits" pattern - so it doesn't matter here whether you choose 1,2, or 3.  Just pick one and continue.

9)  Now you have a blank canvas to start creating your cards.   On the left select "Text & Photo Areas".   Then drag the "Journaling Area" box onto your blank layout.   An editing box will appear.   In the editing box - size your card (my cards are 5"x7" - so that is the size I input in the boxes).  


Click on the text in the journaling box to highlight it and press your space bar to delete it.
Drag the journaling box to place it flush with one of the corners of your layout.   Click on the "Copy" and "Paste" buttons at the top.  This will create another identical journaling box.   Drag it to another corner of the layout to place it.    Repeat for all of your horizontally placed cards (see above - there are 4 horizontal & 4 vertical).   To create the vertical ones - click Copy & Paste again then use the rotation tool (round arrow on corner of box) to turn the box sideways & place as needed.  

When you have all 8 journaling boxes (cards) created -  your layout will look like this - with two small unused squares of space in the centre of each layout.

10)   Next click on the paper tab on the left.   Select any of the papers shown and drag and drop to fill the background of your cards.


11)  Now is time to add your photo boxes.   On the left click on "Text & Photo Areas".  For each card, drag the "Photo Area" box wherever you want to place your photo.    You can use the editing box as needed to size the photo area, add a photo mat, choose photo mat colour, etc.    I used 3.5" x 5" photo areas with 1/8" photo mats.   (Once you've done the first photo area - you can copy and paste using the top buttons to create your remaining photo areas and just drag/rotate onto the cards as needed).


12)  Now select "Photos" on the left and drag and drop your photos onto the photo areas on each card.

13)  Now is time to decorate your cards.    Select either embellishments (buttons, ribbons, etc.) or My Stickease on the left.   Use the drop down menu to select the type of embellishment.  You can drag/drop, resize, rotate all embellishments as needed to customize your cards.   You can also find holiday quotes and tags in the Stickease section that you may wish to use to add greetings to your cards.


14)   To add a custom greeting or your family name, etc. to the cards.   Select "Text & Photo Areas" on the left.  Then drag the "Journaling Area" box onto your first card.    Size your journal box as needed (mine is 1" x 2.5").  You can edit the text, change the background, add a mat, change the font, etc. as needed.   Make sure that the 'scale font' box is checked so that your text fits inside the box.   Once you have your journal box completed - use the Copy & Paste feature to add the same journal box to the rest of your cards.

15)  When you are happy with your cards - click "Buy Project" at the bottom and follow the prompts to complete your purchase.   (At the bottom, click on Approve Layouts, then when approved, click on Checkout).   You can order your printed copies (in whatever quantity you choose) and your cards will arrive in approximately a week.


Studio J layouts are on sale for just $5 each until November 30th - that's $0.63 for each 5" x 7" card.
(After November 30th - pricing returns to the regular price of $7.75 Cdn per 2 page layout).

Start creating your Studio J Holiday Photo Cards HERE.


Wednesday, August 20, 2014

Sending Love Your Way

New artwork from the CTMH Annual Inspirations catalogue! I recreated this card I saw in the Idea Book - so cute.


Materials Used:
CTMH Shin Han Twin Touch markers
CTMH Geometric Washi Tape
CTMH "Lifting Spirits" stamp set
CTMH cardstock & ink


Monday, March 31, 2014

CTMH Stamp of the Month Blog Hop for April

Welcome to the Stamp of the Month Blog Hop for April.   This month we are featuring the stamp set "Balloon Talk".   

Hope you'll join us this month - we have CTMH consultants from across the US and Canada who have created some great projects for you featuring this month's stamp set.    The variety of ideas are sure to leave you feeling creatively inspired!

If you've come here from Mary Eisen's Blog, then you are on the right path.  If my blog is your first stop, that will work too! Just keep hopping until you get back here again!   You'll find a link at the end of each post to move to the next site.  Enjoy :-)

My creation for this month's blog hop is a card - pattern is from Make it From Your Heart Volume 2!


Materials Used:
CTMH Stamp of the Month for April 2014 - Balloon Talk
CTMH Paper: Balloon Ride
CTMH Cardstock: Desert Sand
CTMH Ink: Sorbet & Crystal Blue
CTMH Bronze Shimmer Trim Tape
CTMH Foam Tape
CTMH Corner Rounder

The April stamp of the month is available from your consultant (or from me!) for just $17.95 during the month April OR -  get it for just $5 with any CTMH purchase of $50 or more between April 1st & 30th.


To see more great artwork using this stamp set - keep hopping!   Next stop is Shirley's Blog!

Sunday, January 12, 2014

CTMH Circle Spin Cards

Hey everyone - - hope you are all having a great weekend!   I was sifting through pics on my computer and came across a few projects that I realized I hadn't yet shared here on the blog.     I wanted to share with you a super fun product CTMH carries for card-makers - - Circle Spin cards.    These cards just add a little something extra and bring your homemade cards to the next level!     Each card has a square cutout window and there is a cardstock circle, suspended with string inside the window.   You decorate both sides of the little cardstock circle.   When you open the card, the circle spins around - so fun!   

Here are a few examples:

CTMH Frosted collection

CTMH Laughing Lola collection

CTMH Laughing Lola and Proplayer collections

CTMH Babycakes & Huntington collections

CTMH Proplayer & Laughing Lola collections

Here are some of the other products used on these cards (don't you love these super cute stamps - only $2.95 each!):


You can find all of these products on my WEBSITE.

Enjoy the rest of your day!


Thursday, December 26, 2013

Merry Christmas!

Hope you have all had a wonderful few days celebrating the holidays with family & friends!


If you have some time, be sure to check out all of the holiday inspiration in the Let's Get Sketchy Sketch Inspired Magazine Holiday Edition online now!  


My card above - featuring the CTMH Frosted collection - is one of the ideas you'll find inside.
Enjoy!!

Wednesday, December 11, 2013

Happy Holidays Washi Gift Card Holder

Hey everyone!!  Last month at my retreat I taught this cute little gift card holder for one of my make & take projects.   Perfect for Christmas gift card giving!


These were so fun & easy to make!   The gift card holder base is cut from the CTMH Artiste Cricut cartridge (page 59, cut at 5.25").   The ornament on the front is also from the Artiste cartridge (page 79).   To decorate the ornament, I simply laid strips of washi tape and shimmer tape across the ornament, leaving small strips of white cardstock to show between each row.   I then flipped the ornament over & trimmed around the edge so that the washi & shimmer tapes were flush with the ornament edges.   I also popped up the ornament on the front with foam tape for added dimension.    The edges of each patterned paper are inked in slate ink to give it a more finished look.    The gift card holder fits perfectly is a standard 4.25" x 5.5" envelope.  

So fun!  

Materials Used:
CTMH Sparkle & Shine paper collection
CTMH Sparkle & Shine washi tape 3-pack
CTMH red shimmer trim (temporarily on back order - back in stock soon!)
CTMH ink: ruby & slate
CTMH cardstock:  white daisy
CTMH Cricut cartridge:  Artiste
CTMH stamp set:  Perfect Fit - Holidays
3-D Foam Tape
CTMH Neutral Assortment Bakers Twine

Have a great day!

Thursday, November 28, 2013

Frosted Christmas Cardmaking Kit

Have you started on your Christmas cards yet!?!? Hard to believe December is just a few days away.
With the help of CTMH's Frosted Cardmaking kit, I was able to make 15 great holiday cards in just a few hours.   The kit makes 5 each of the following 3 designs.    The stamp set that comes in the kit is a 'must have' in my books!! 


You can get your Frosted Cardmaking Kit HERE!   

Thanks for checking in today and a very Happy Thanksgiving to all of my American friends :-)


Tuesday, November 19, 2013

Hello Little One!

My cousin & his wife recently had a baby which gave me occasion to play with the CTMH Babycakes collection.

Here is the card I made for them using Mojo Monday Sketch #318:


Materials Used:
CTMH Babycakes collection
CTMH Babycakes stickers
Die Cut Words - CTMH Artbooking Cricut Collection
CTMH Cardstock: Colonial White, Chocolate & Sunset

Hope you are having a great week!


Monday, October 21, 2013

Sparkle & Shine Christmas Card Kit - Available Now!

I'm so excited to share these cards with you today!

Based on feedback from my customers - I have found that many people prefer Christmas cards that are large enough to hold 4x6 or 5x7 photos for sending to family & friends.   CTMH has designed some great card kits this year (shared with you HERE) - but the cards are smaller - 4.25" x 5.5" and 4"x4".    So I wanted to give you another option if you were looking to include larger photos in your holiday mailings.   Another consideration for me in designing holiday cards is the CTMH "faster, simpler, easier" philosophy.  If you are anything like me - you send many, many cards each holiday season - that means these cards need to be simple and easy to assemble so that I can make a large quantity in a short amount of time.   Also - for ease of mailing, I do not use any bulky embellishments.

Here is what I came up with - a set of 12 clean & simple cards that you will be proud to send to your loved ones!   (I apologize for the terrible lighting in these photos - apparently there was a streak of light from the window that I didn't notice until I was editing these!!)


Inspired by Pattern #19 in Make it From Your Heart Volume 2


Inspired by Pattern #26 in Make it From Your Heart Volume 2


Inspired by Pattern #28 in Make it From Your Heart Volume 2

Inspired by a card I saw on Pinterest by Julie Warnick

Inspired by Cibele Glazer


Inspired by a card on Pinterest that I cannot, for the life of me, find again!  


I'm offering these cards in kits - each makes 12 cards (need more than 12 cards?  order multiple kits!).
Kits include pre-cut paper and pre-stamped sentiments where applicable - you simply assemble.
Included:  Colour photos of each finished card, assembly instructions, 12 card bases & envelopes, Sparkle & Shine paper (pre-cut), cardstock (pre-cut), 1 package of Sparkle & Shine Complements chipboard pieces, 1 roll of 3-D foam tape, and quantities of Silver Shimmer Trim, Red Sparkles, Bitty Sparkles, Red Chevron Ribbon, Slate Satin Ribbon as needed to complete the cards as shown.

Kits are just $30 each!
Order now - while supplies last!
Available to Canadian customers only.


Options


EDIT FEB 3rd 2014 - - ONE KIT LEFT!


LinkWithin

Blog Widget by LinkWithin