Here are the cards I made last year:
Here is how-to make your own:
Each Studio J layout is two 12x12 sheets (high quality photo printing!). My cards are 5"x7" size - so I was able to fit four per sheet or 8 cards per 'layout'. If your cards were smaller - you could obviously fit more.
1) Go to my website carlaironside.ctmh.com & click on "Products" then "Studio J Online Scrapbooking".
2) Click "Enter Now" and either login or create a new account if your are a new user.
3) On the welcome screen, click "Create a New Project" & then name your project when prompted.
4) Click the uploading button to select the photo(s) you want to add to your holiday cards.
5) Then select "Create your own Custom Layout".

6) You'll now be asked to select your paper kit. At the top you can choose to filter the kits - select "Holiday". Then select which paper collection you'd like to use on your cards. The one I used above is called "Sparkle & Shine". Others I would recommend are Snowhaven, Pear & Partridge, Mistletoe, Jingle, Believe, Evensong, Frosted . . . so many great choices. (To select it, either double click on it or click once on it and then click "Continue" at the bottom).

7) You'll now be asked to choose the layout pattern - select the "NO LIMITS" pattern.
8) Select a Kit Mix - - these are blank for the "No Limits" pattern - so it doesn't matter here whether you choose 1,2, or 3. Just pick one and continue.
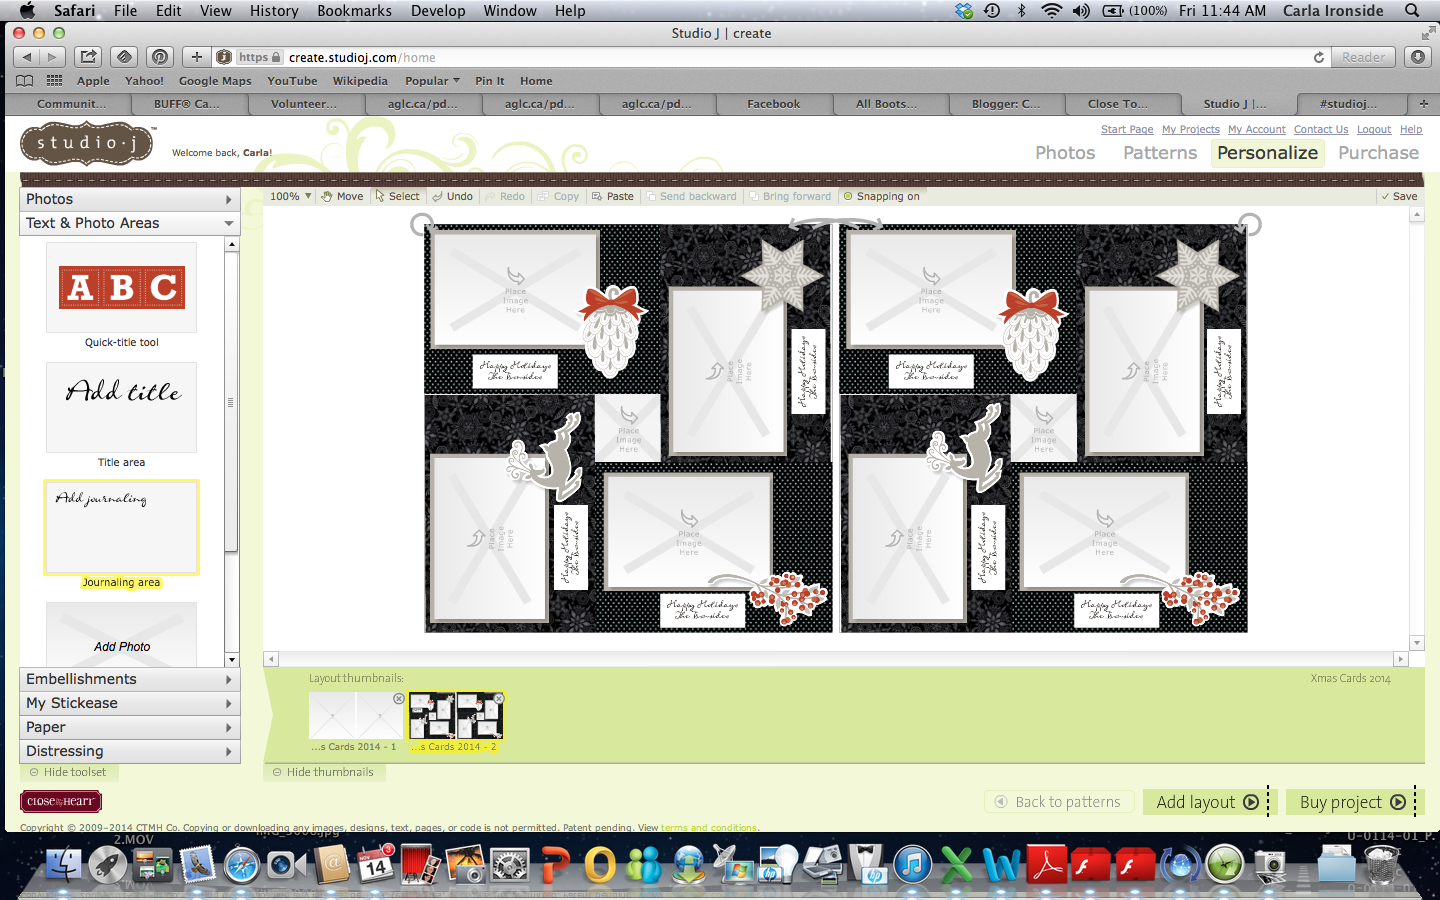
9) Now you have a blank canvas to start creating your cards. On the left select "Text & Photo Areas". Then drag the "Journaling Area" box onto your blank layout. An editing box will appear. In the editing box - size your card (my cards are 5"x7" - so that is the size I input in the boxes).

Click on the text in the journaling box to highlight it and press your space bar to delete it.
Drag the journaling box to place it flush with one of the corners of your layout. Click on the "Copy" and "Paste" buttons at the top. This will create another identical journaling box. Drag it to another corner of the layout to place it. Repeat for all of your horizontally placed cards (see above - there are 4 horizontal & 4 vertical). To create the vertical ones - click Copy & Paste again then use the rotation tool (round arrow on corner of box) to turn the box sideways & place as needed.

When you have all 8 journaling boxes (cards) created - your layout will look like this - with two small unused squares of space in the centre of each layout.

10) Next click on the paper tab on the left. Select any of the papers shown and drag and drop to fill the background of your cards.

11) Now is time to add your photo boxes. On the left click on "Text & Photo Areas". For each card, drag the "Photo Area" box wherever you want to place your photo. You can use the editing box as needed to size the photo area, add a photo mat, choose photo mat colour, etc. I used 3.5" x 5" photo areas with 1/8" photo mats. (Once you've done the first photo area - you can copy and paste using the top buttons to create your remaining photo areas and just drag/rotate onto the cards as needed).


12) Now select "Photos" on the left and drag and drop your photos onto the photo areas on each card.
13) Now is time to decorate your cards. Select either embellishments (buttons, ribbons, etc.) or My Stickease on the left. Use the drop down menu to select the type of embellishment. You can drag/drop, resize, rotate all embellishments as needed to customize your cards. You can also find holiday quotes and tags in the Stickease section that you may wish to use to add greetings to your cards.

14) To add a custom greeting or your family name, etc. to the cards. Select "Text & Photo Areas" on the left. Then drag the "Journaling Area" box onto your first card. Size your journal box as needed (mine is 1" x 2.5"). You can edit the text, change the background, add a mat, change the font, etc. as needed. Make sure that the 'scale font' box is checked so that your text fits inside the box. Once you have your journal box completed - use the Copy & Paste feature to add the same journal box to the rest of your cards.
 15) When you are happy with your cards - click "Buy Project" at the bottom and follow the prompts to complete your purchase. (At the bottom, click on Approve Layouts, then when approved, click on Checkout). You can order your printed copies (in whatever quantity you choose) and your cards will arrive in approximately a week.
 Studio J layouts are on sale for just $5 each until November 30th - that's $0.63 for each 5" x 7" card.
(After November 30th - pricing returns to the regular price of $7.75 Cdn per 2 page layout).
Start creating your Studio J Holiday Photo Cards HERE.

Thank you for this, Carla! This is great!
ReplyDelete